I have completed the first draft of my Design Thinking (Light) Notion template.
In this post, I will share behind-the-scene highlights and my next steps.
Recap: about the product
I envision a very simple all-in-one tool for a small team or solopreneurs that:
guides users through the Design Thinking (light) process
captures and stores all relevant information
offers an at-a-glance summary dashboard
emphasizes more on information organization than large team collaboration (the focus of many existing tools)
For more details, check out build Log #4 post.
Expanding the conventional process
Conventional Design Thinking
The conventional process shows 2 spaces and 5 steps.
Problem Space
Stage 1: Empathize - Research your users' needs
Stage 2: Define - Frame the challenges and problems
Solution Space
Stage 3: Ideate - Brainstorm possible solutions
Stage 4: Prototype - Develop prototypes
Stage 5: Test - Evaluate prototypes with representative users
What’s missing
However, in practice, I feel that 2 things are missing from this traditional model.
Kick off. To start, in real life, a project always starts with an idea, a need, or a pain point. I have also written that innovative projects often starts with an observation and a reaction.
For instance, “we are losing customers because they don’t like to line up outside the store in bad weather” or “I am so fed up with copying and pasting between the 2 systems”.
Information like this must be captured as it helps guide user research and problem definition.Research Landscape. A successful solution cannot come from empathizing with users alone (Stage 1). It is equally important to have a 360 understanding of the context i.e. the landscape.
Some considerations include: What are the current solutions out there? Which one are most popular? How much are they? Are there relevant trends and industry insights?
In other words, there is a need to incorporate Competitive Analysis into the exercise since no users live in a vacuum.
My Modified Design Thinking
Therefore, my modified version includes 7 stages:
Problem Space
Stage 1: Kick off - Capture early ideas
Stage 2: Empathize - Research your users' needs
Stage 3: Define - Frame the challenges and problems
Stage 4: Research - Understand the landscape
Solution Space
Stage 5: Ideate - Brainstorm possible solutions
Stage 6: Prototype - Develop prototypes
Stage 7: Test - Evaluate prototypes with representative users
Rewording Design Thinking stages
Conventional Design Thinking
I do not like how the stages are named. You cannot just look at the terms and understand what a stage entails.
I want my tool to be as user-friendly as possible for everyone, not just those who have deep knowledge of Design Thinking.
My Modified Design Thinking
I have replaced all headings with self-explanatory and action-oriented terms:
Jot down your raw ideas
Know the user well
Define the problems
Research the landscape
Ideate Solutions
Develop Prototype
Test Prototype
As you can see, using natural language instantly helps clarify the purpose and action for each step.
Connecting the Problem Space and the Solution Space
Conventional Design Thinking
Last but not least, I want to emphasize the relationship between the Problem space and the Solution space. In real life, you move between the 2 spaces as you iterate across research, ideate, prototype, and test.
For example, during ideation, you may identify a new consideration that sends you back to conducting more user research. Or during prototype testing, you discover a user trend that requires more landscape research.
Many visuals show Design Thinking as a linear process. I wanted to see if Notion may allow a creative way to visually remind users the importance of iterations.
My Modified Design Thinking
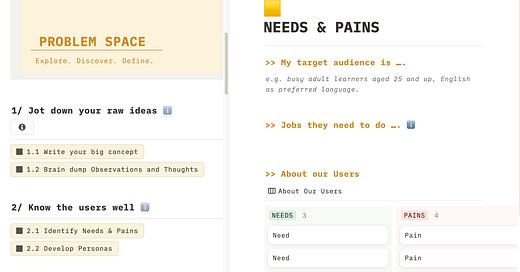
Making use of the automation and “side peek” functions, my tool allows users to view the Design Thinking process along with access to working on individual stages (see image below).
When a user is brainstorming on the main page, they also never lose sight of data collected in earlier stages (see image below).
Note that the Side Peek view is only available on the desktop version.
Next Steps
With the basic skeleton in place, I’ll continue to refine the interface elements to perfect the usability and user experience.
In addition, I need to start considering how to user test the prototype. One of my biggest challenges has always been finding users to test my concept. If you are reading this and are interested in helping out with my user test, please comment below or send me a DM, much appreciated!
Previously in this series:
Build Log #0: Follow me along my Journey of Innovation
Build Log #1: Create a way out of Tedious Analogue Tracking
Build Log #2: Tips on organizing Initial Thoughts
Build Log #3: Overcoming a Roadblock - Innovating without access to Users
Build log #4: Pivot to building a Notion template
Build log #5: Anticipating Challenges
Build Log #6: Assumptions being challenged


